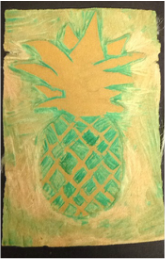
For my second gamification project I choose to print make. For this project I used many different tools such as a carver, carving board, roller, pressing tool, and tray. First I got a chunk of linoleum. I then found the design I wanted on the internet. As you can see I chose a pineapple. I then traced the pineapple really hard onto the linoleum. After that I heated up the linoleum with a hair dryer. Then I started to carve into it. after everything was carved out, I got paper then inked it up and started to print. The thing I disliked most about this project was how long it took my to carve everything. As I was making this I was really excited, because pineapples are very cool! I have a pineapple phone case so that was sort of my inspiration. If I would change or do anything differently I would have carved out the pineapple better and taken more time for quality work. |
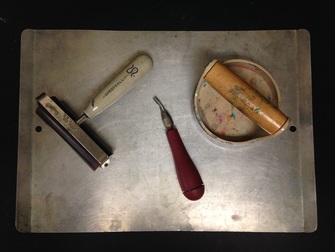
2 Comments
The first thing I did was brainstorm ideas of what I wanted to paint. I looked around Mrs. Meyers art room, I found something similar to what I made, that was my inspiration. Then i went and got paint... and just started. Every once in a while I had to stop and think about what I wanted to put in. Like the fence, tree, and even the little girl. From doing this project I learned that when you paint you need to be very patient, it helps a lot. During this project I learned a new way to paint. When I painted the "leaves" on the tree, Mrs. Meyer taught me a new technique. you push your paint brush into the paper a special way and it makes it look like leaves. While I was painting this, I didn't feel too confident. Only because I'm not the best artist. If I could add anything to my project, I would probably add a better background of some sort. To improve my work I probably would've taken my time and went back and cleaned things up.
This project is supposed to show a picture of you and someone your close to and make it into something special. Make a background of something that reminds you of them. I chose a picture of me and my little sister, (as you can see in the top right corner) Then I combined our picture with a picture of the ocean because my little sister is carefree and happy, which reminded me of the ocean. When your doing this project you have to make sure its in black and white, because when i made my first draft...I forgot to turn it to black and white. So I ended up having to redo the whole thing. The hardest part of this project is probably the erasing, only because you have to be very precise when you do it and if you mess up its pretty noticeable. Otherwise, this is a really fun project and a really great way to get involved with digital art!
This is my print making project, and I'm going to tell you the steps on how to do this. First you get a chunk of linoleum, and you have to figure out what design we wanted. Which as you can see I chose the Nebraska Corn husker logo. But remember... when you start to draw your design on your paper draw it backwards. As you can see in my sketch I drew the letters backwards because then when you print it will transfer correctly. Then you can take a blow dryer and warm up your piece of linoleum, this will make it easier to carve it out. To carve you use just simple carving tools, they come in different sizes. Then once you carve everything out your ready for ink. First off get a big piece of white paper. Then you get a metal tray, and a brayer. A brayer is like a roller that you can transfer your ink to your linoleum. Roll the brayer on the tray until the ink makes a sort of tacky noise. Then once you ink up your piece of linoleum, stick it to the paper (make sure you don't wiggle your paper or linoleum) Then press it down with your hands using a lot of pressure. Pull it off then wait for it to dry. Next cut out all of your prints and label them. I hope your printing experience goes well and you have a fun time! Design-An-Ad
|
About the AuthorHi! I'm Alivia. I am an 8th grade student, showing you my artwork for my art class. I hope you enjoy! |